It’s the fight night that everyone has been waiting for. Well, everyone in the testing world. Well, everyone in the Original Software office, anyway.
If you’ve read any of our content before, you’ll know that our relationship with spreadsheets is… strained. We love spreadsheets in lots of places – managing the office fantasy football team, for instance, or for putting together a quick graph. But when it comes to managing your software testing, spreadsheets are far from ideal.
Despite this, in recent polls we conducted at MUGA (the M3 User Group of America) conference and of Infor Syteline users we found that over 70% of respondents don’t use specialized software for their test management. This means that, in all likelihood, they are managing things using spreadsheets.
In this blog, we’ve decided to put our money where our mouths are and directly compare spreadsheets and the Original Software testing platform in a bare-knuckle, winner-takes-all fight. We’ll have multiple rounds, each focusing on a specific aspect of the software testing, comparing how the spreadsheet handles things and how our platform does. The spreadsheets (because of course there is more than one) we’re showcasing here are genuine spreadsheets used by one of our people in a previous life (though obviously anonymized).
Ding Ding!
Round 1: test cases
A vital part of any testing cycle is the creation and management of test cases. After all, without test cases you can’t get any manual testing done. So, let’s take a look at the Test Script Template that’s been painstakingly put together in Excel:
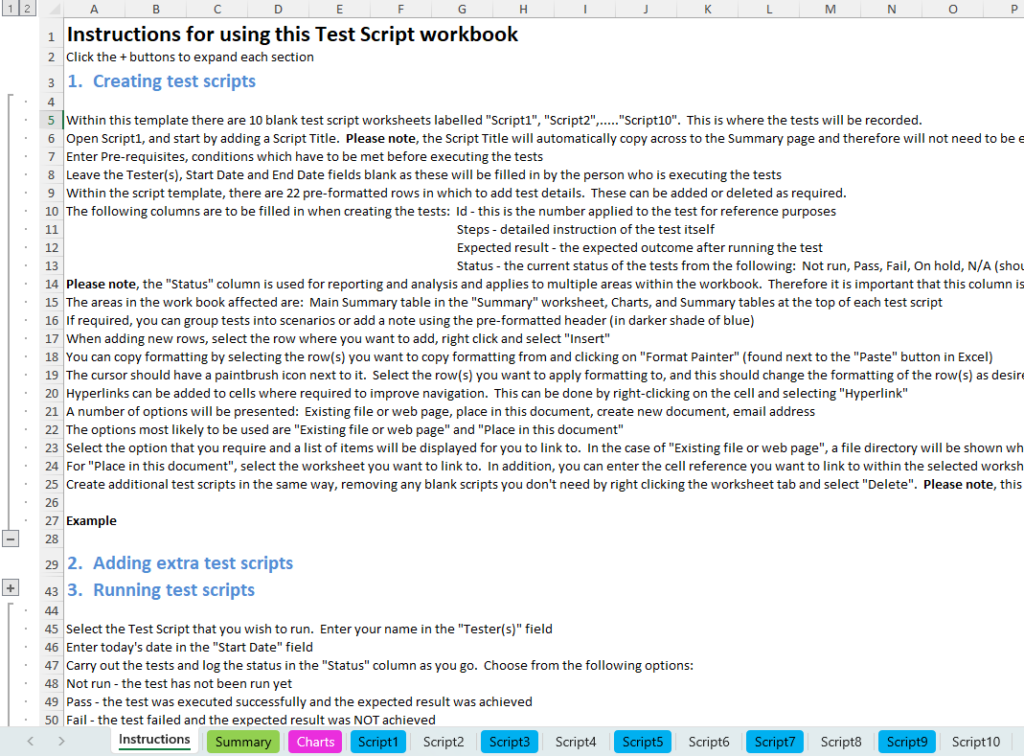
Straight away, we can see a long set of instructions for how to use the spreadsheets, which many users may find difficult to digest. Depending on the complexity of your spreadsheet – the presence of linked sheets, formulae, and the use of locked cells or drop-down lists – the consequences of not following the instructions correctly could be serious indeed.
Now, let’s take a look at a test script itself:
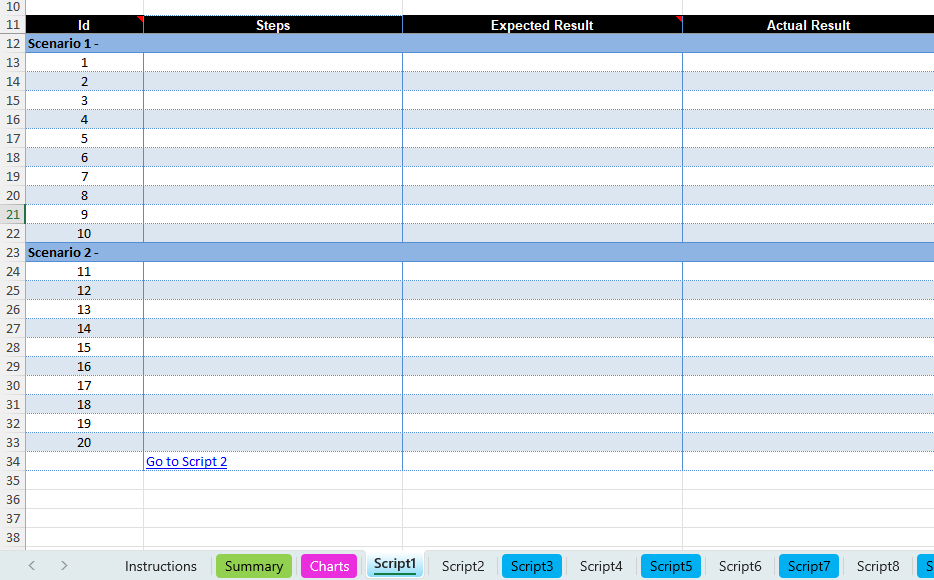
Every step needs to be manually typed in. In this particular spreadsheet, not only does the test manager have to type in the test step, they have to type the result the user should expect to see. Then, once the user does the tests, they get to type out what they actually saw. Now, imagine how much effort it would take to update your tests scripts if the software changes, if you were using this spreadsheet.
Finally, here’s a look at how those test cases might be shown to the test manager during an actual testing phase:
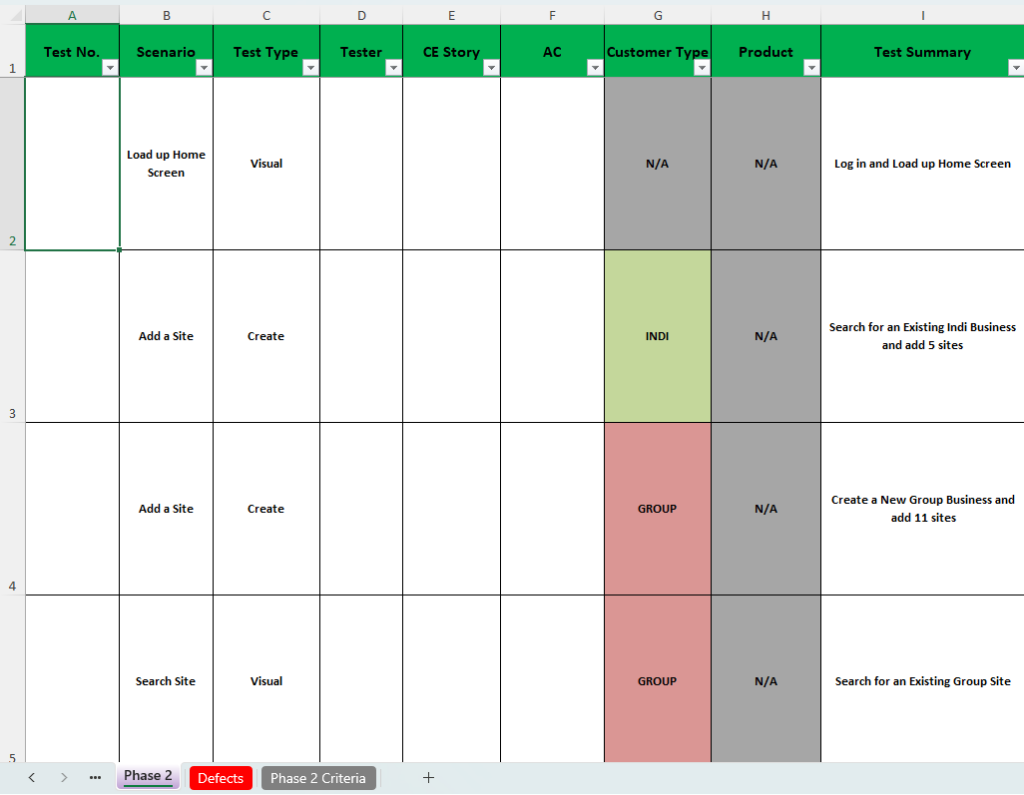
There’s no way from here to view the steps in an individual test case, or even to easily see the complete library of test cases to make sure you have all the test cases you need.
Now, let’s take a look at how this is managed in the Original Software testing platform:
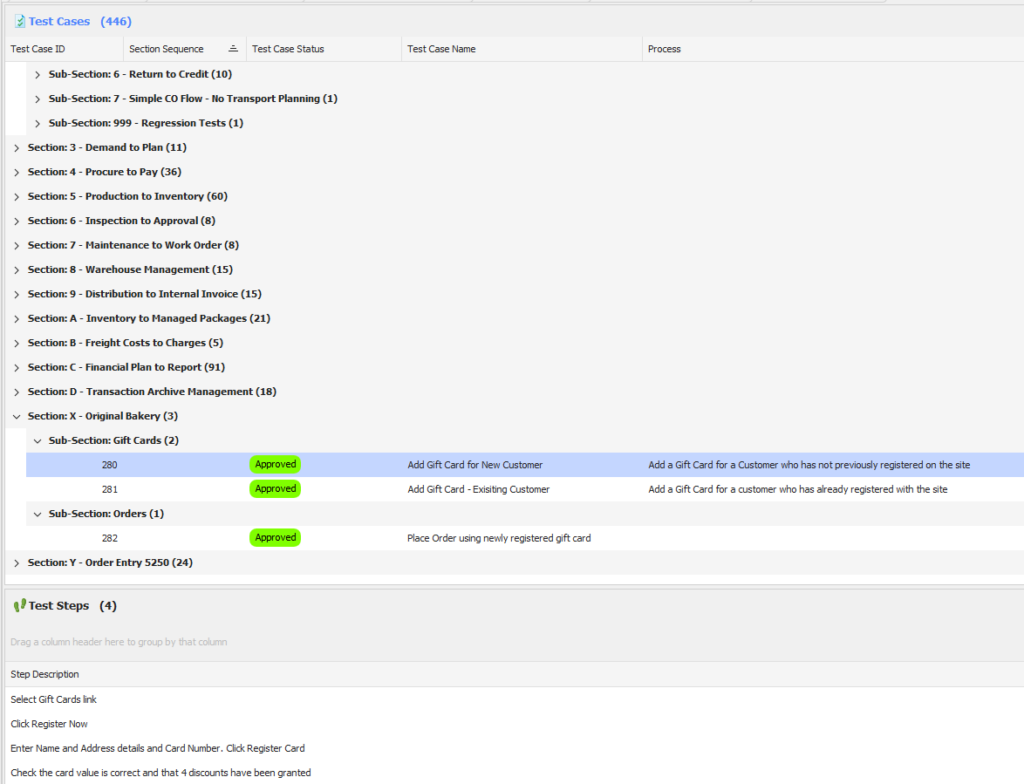
The top half of that window is a complete list of the test cases you have, while the bottom half is a view of the individual steps in a test. Simple, right? When you’re creating test cases, the steps still need to be manually entered, but the information is much clearer to edit. You may also have seen that there are no instructions for the tester. That’s because the tester sees the steps for a test like this:
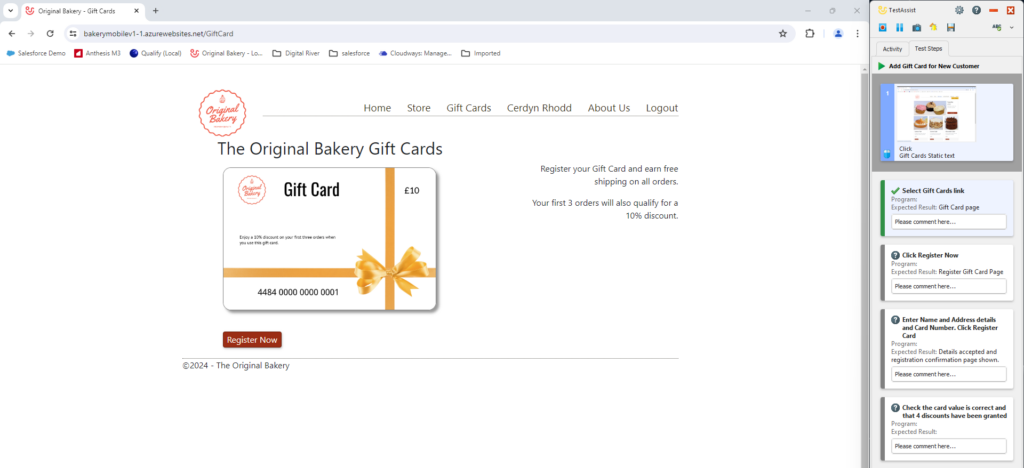
The test steps appear in line alongside the actual application. No clicking back and forth between a spreadsheet and your application to fill out the results of the test. We’ll come on to that in more detail in the next round, though.
Finally, here’s what those test cases look like in an actual testing phase:
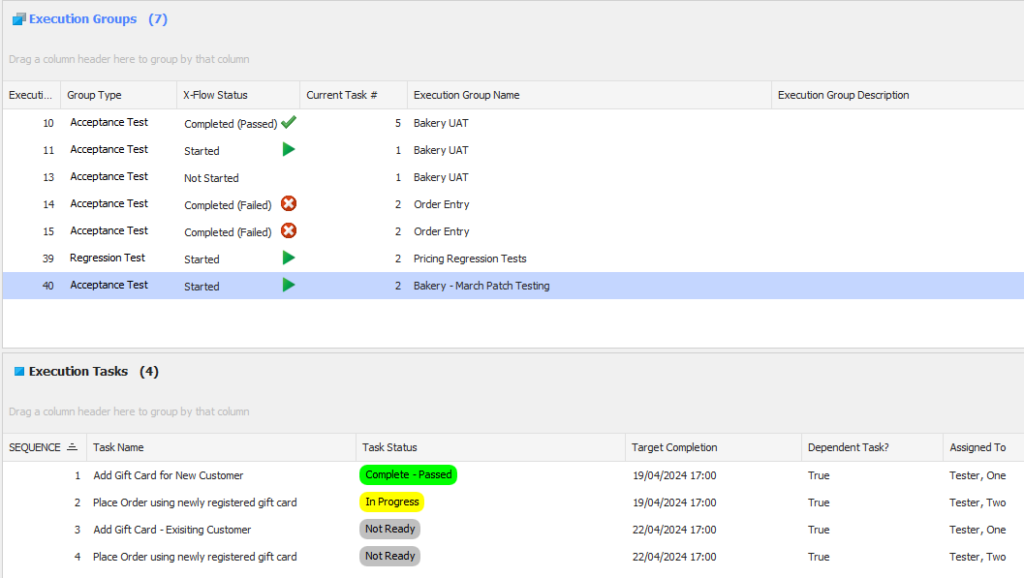
Because you’re working in software instead of spreadsheets, the view is much cleaner and easier to understand – and there are no finnicky formulae for you to write, or for anyone else to accidentally break.
So, spreadsheets took some heavy blows there – but they’re still standing. Let’s move on to round two.
Round 2: test capture
Once you have your test cases documented, it’s time to actually capture some test data. There are really only two relevant pieces of information you need for this step:
- Did the test pass or fail?
- What issues came up during the test (whether they were bugs that meant the test failed, or observations that would make the end product better).
You’ll remember from the screenshots above that when it comes to capturing test data, it’s a very manual exercise. You fill in the cell for each test step, documenting the outcome. In our specific example, some cells have drop-down lists to help you pre-populate your response (such as the “status” column, where you record if the test has passed or failed) but others do not, introducing the risk of data being classified or grouped incorrectly.
On top of this, because we’re working in a spreadsheet options for leaving feedback are limited to text, or pasting screenshots into a spreadsheet. Neither is great – though admittedly both are better than a comment saying “see the screenshot I emailed you”, which is also highly likely.
Compare this with that screenshot of how the user takes a manual test using Original Software:

Again, the inline nature of the test steps is important, reducing scrolling and making the process smoother and more enjoyable for the tester. Now, let’s look at how they add feedback:
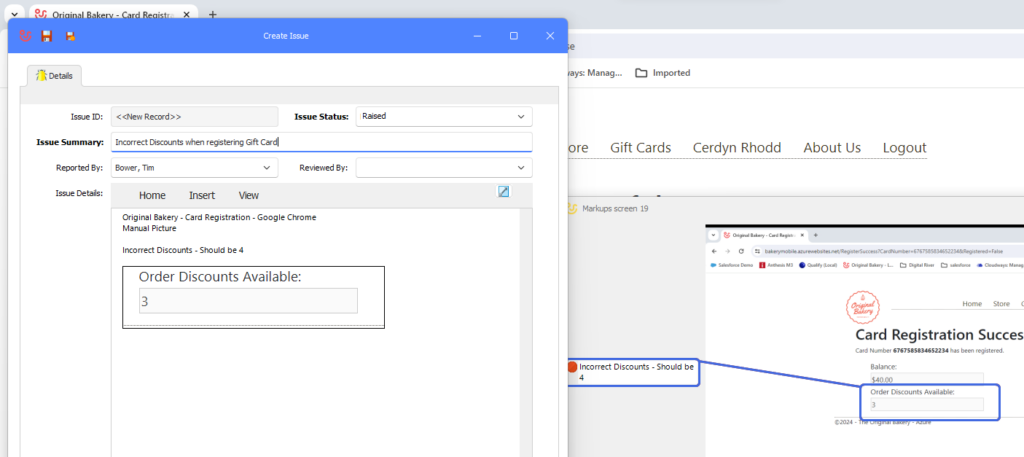
They’re marking up a screenshot that’s been automatically captured by the platform. When the test manager (or the developer) reviews the test results, not only will they have a marked-up screenshot giving them plenty of context for the commentary added by the tester – they can also see every single step that led up to that issue. No more “can you come and replicate that on my machine?” holding up your testing.
Incidentally, the way Original Software records tests makes for a perfect audit trail of your testing process. Should an auditor need to see it, you can show them every step of every test you’ve run, and every piece of feedback in context and in full.
After round two, spreadsheets seem to be on the ropes, eyes glazed, but still standing – just. On to round three…
Round 3: bug resolution
Whether you conduct manual testing using spreadsheets or specialist software, your test results need actioning. It’s useful to think of that as a three-step process:
- Triage the feedback so that developers tackle the right issues first
- Enable the developers to replicate an issue so that they can fix it
- Track progress on the fix so that the test can be redone once the issue has been fixed.
Fresh from its water break and pep talk from its manager, here comes the spreadsheet:
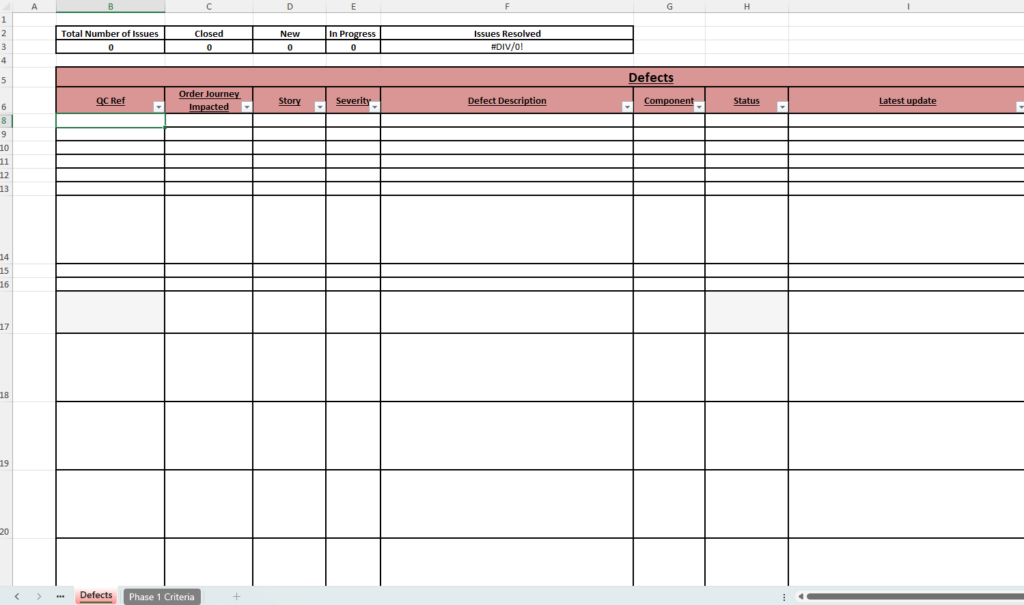
Let’s start with triage. We know from the other spreadsheet that the tester has already rated the severity of the issue, but now that information needs re-entering instead of the data being linked (though of course that would add its own complications). And, of course, if the test manager wants to investigate the issue further to check whether it’s been classified correctly, they have no choice but to find the test case and read through it to make the call themselves.
Next, let’s look at enabling developers to replicate the issues raised. What’s needed here is context – what exactly did the tester click, what data did they enter, and so forth. Most of that information is going to be recorded in column F – but, remember, we’re just entering data on a spreadsheet. It’s likely going to be tricky for users to add in screenshots for context, and unless they are particularly verbose they aren’t likely to type much in the way of a description to help the developer here. They may even have forgotten how they created the issue, if they forgot to fill this cell in at the time of the test or had an unfortunately timed coffee break or meeting. All of which means that, if the developer can’t replicate the issue, they’ll need to get the user back to recreate it for them.
Finally, let’s take a look at how progress is tracked and reported:
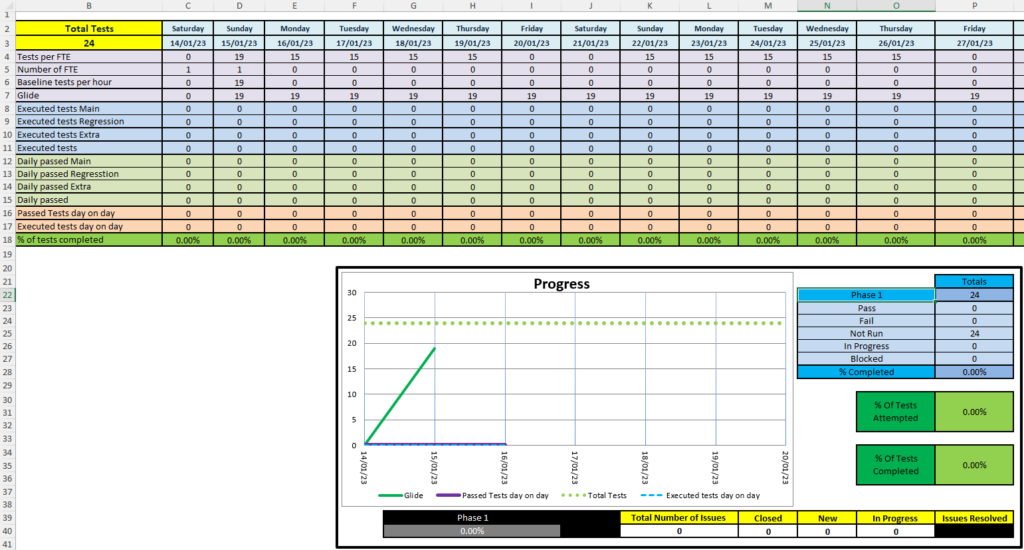
Issue reporting is tracked using the black and yellow boxes in the bottom corner. It’s not much to go on, is it?
So, final punches thrown for spreadsheets, let’s see how the Original Software platform responds.
Firstly, triage:
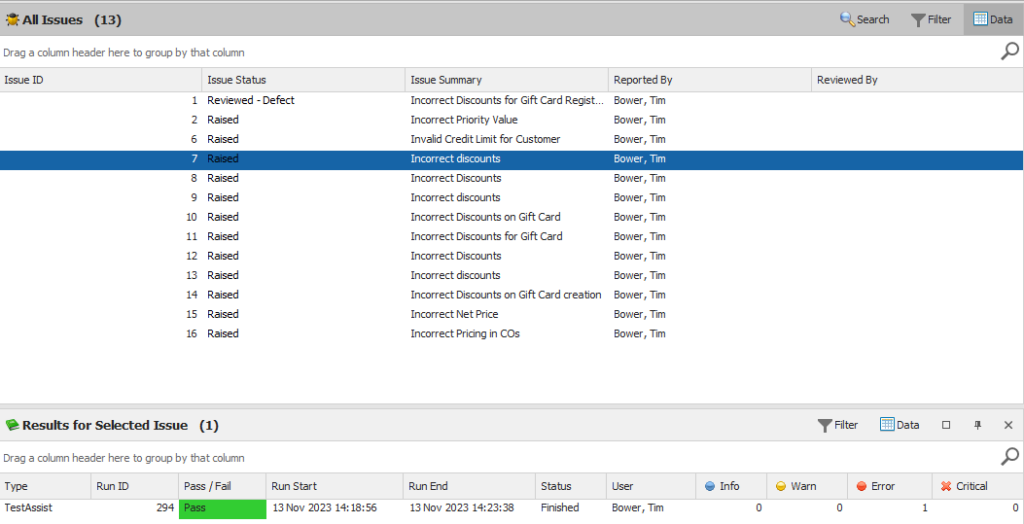
This view is of all the issues in our test organization. In the top window you can see whether an issue has been raised by a tester, or reviewed by the test manager – and the outcome. Below that, you can see that issue’s history. In this example, we can see that the highlighted issue actually passed the test, but that there was an error. As you can see, issues are visually classified to enable the test manager to triage as quickly as possible.
If the tester needs to, they can click through into an issue to see the screenshots and commentary from the tester in context:

It’s all available in one place, and the amount of data input required from all parties is minimal.
Secondly, enabling developers to reproduce issues. We’ve already covered how Original Software automatically captures screenshots and every action the user takes during a test. Original Software integrates with a number of developer platforms, including Jira, meaning that once an issue has been triaged by a test manager (or not, if you don’t want to), an issue is created in your developer software with a link to all the necessary context. It’s therefore much easier for developers to replicate issues by themselves, while at the same time the level of manual feedback the tester needs to give is reduced because the platform is doing it for them.
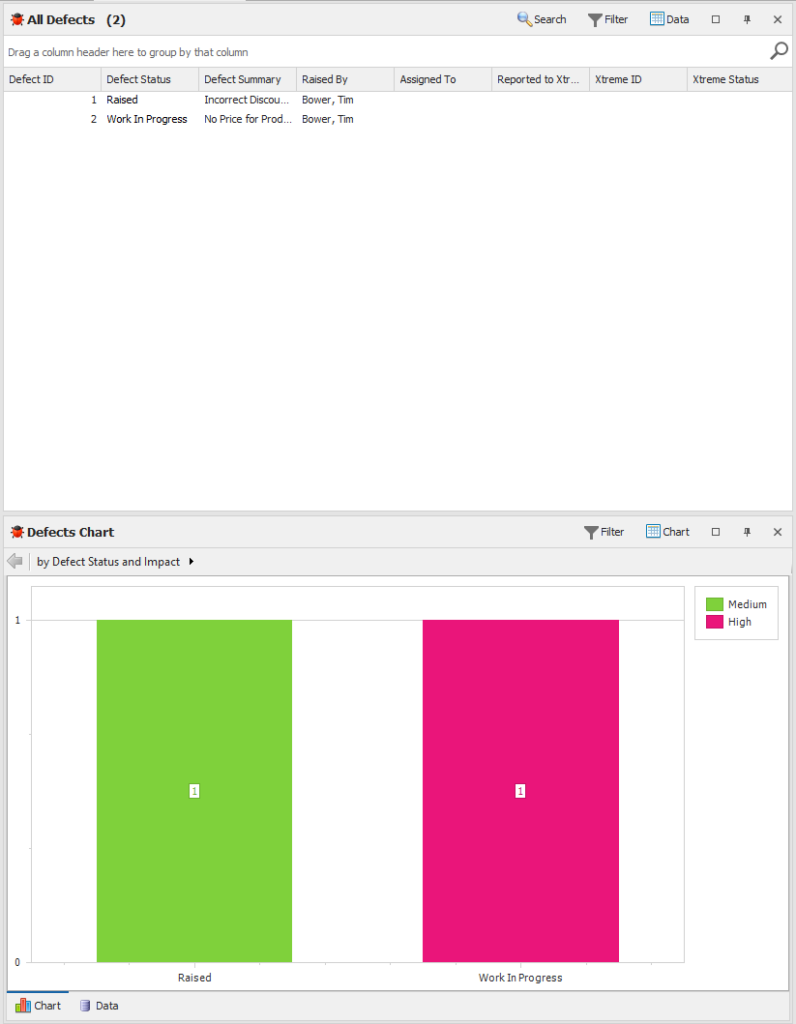
And, finally, we come to tracking progress. Going back to our earlier screenshot of all our issues, the top right shows us all the defects that have been passed to developers by the test manager. You can also see a visualization of the data in the bottom chart, with issues being displayed by impact and status so managers can check how issues are moving through the process. Again, it’s all available in one place, it’s all displayed as visually as possible to make it easy to understand, and detailed information is available in just a few clicks if needed.
And, as the final bell goes, spreadsheets are down! It’s all over.
Democratizing test management with software
There will be spreadsheet fans out there reading this and complaining that the spreadsheets we’ve shown aren’t good examples of how you would use Excel to handle this sort of work. You can lock cells to prevent breaking formulae, for instance, and a few more dropdown menus would make things a bit easier.
But that’s part of the point. If you’re using spreadsheets, the efficacy of your testing tools will be down to how well the builder of those files knows Excel. And, if that person leaves, you may find that the skills needed to recreate or fix these spreadsheets is lost. After all, the trend of using software to accomplish tasks traditionally done in spreadsheets isn’t going anywhere (look at all the bookkeeping software out there, for instance) – chances are the skill level in Excel in your organization is going to go down, not up.
If you want to futureproof your testing processes and keep things moving forwards, you need to de-skill them. You shouldn’t need to be an expert in spreadsheets to do software testing, or to manage the process. The only thing you should be an expert in is the discipline of project management if you’re a test manager, or your job if you’re a business user doing testing. That’s what the Original Software platform is all about.
Using our platform takes away so many of the traditional software testing headaches – especially for manual testing. Manual data entry (both of test cases and of test results) is reduced as much as possible, and made easier to do and understand afterwards where it can’t be avoided. Communications between testers and test managers are simplified, and all test data is stored and viewed on the platform so there’s never any confusion about where test assets or results are. Audit trails are created automatically, and because the quality of your test results is much higher, the defect resolution process is much smoother.
We haven’t even talked about test automation, since it largely doesn’t happen using spreadsheets, but our platform manages all that in the same place as your manual testing. You really do get one place to manage, capture, and automate your testing.
If you’d like to knock spreadsheets out of your testing processes, we can help. Click here to get in touch and start your journey to testing heavyweight.


